Wednesday, 29 June 2016

Crystal Galleries

Hi

With a view to setting up a business in glass etching I recently had a trip to Crystal Galleries located in Middlesbrough north east England for a tuition session in using Rapid Mask, watching the videos is good but getting to know it first hand can't be beaten, I was there for around 3 hours and didn't realise how big Crystal galleries was as a business.


I was shown around by Kevin Cowey the General Manager who told me the history of the business and how one man in his shed etching glasses turned it into one of, if not the biggest suppliers of etched glasses and trophy's in Europe, plus all of the supplies required for the etcher.

From the masking


The glassware


The cabinet


And even the presentation box


Plus every bit inbetween.

I was shown all aspects of the business, from the artwork department,


to blasting, packaging and also the warehouses which hold around £800,000 of stock at any one time, got to be the biggest in Europe.


Because of such a high turnaround and big runs of etched work individual UV masks aren't cost effective and to slow, so for each design one UV washout resist is made and this is used as a screen print template. A sticky back tissue like paper is used for the resist base and a quick drying blue resist paste is silk screened onto the tissue.


Out of the multitude of items supplied by crystal probably the cheapest, was for me what I had been searching for and that was a sheet of paper, not just any paper but Folex /F laser film.

This does away with the ink jet printer and the laser is used in its stead, no more expensive printer cartridges or figuring which side is up for printing as both sides can be used.
It costs 30p a A4 sheet which in the terms of paper is pretty expensive but it can be re-used by placing the new design next to the one already printed, I have a flat bed UV unit so the paper can lie flat and the resist placed on the correct design.
So just keep your print page separate and add to it with each new design until full then start a new page.


These are my last jobs I just kept adding to and reprinting until the paper is all used.


This was a very quick process as 5, 10, 20 as many as required can quickly be screened off to create the order. Once made the wet resist goes through a dryer then another worker trims to size and its out to the glass area.


Where a group of skilled workers position the resist onto the glass which could be either trophy's, glasses or most anything then masked off and etched.
Another section of workers then remove the masking and resist before cleaning, wrapping and packaging.
The cabinets used, sold and designed by them are made by Vixen a local firm that makes some of the best blasting equipment, very good quality but a little expensive for my pocket at around £2000.

There is also a colour section where the different colours are screened onto a firing base which is then applied to the glass for kiln firing overnight, the base burns off and the colour adheres to the glass.


After my tour Kevin showed me how to make resists with both Rapid and Washout, this was very informative especially as I realised the mistakes I had been making straightaway. It firstly re-enforced what I new, in that bad art work in bad work out, the Rapid mask is so good that it picks up every detail so always have good artwork. Another mistake I was making was a to long exposure time, I was using 2 to 21/2 minutes thinking the longer the better (wrong) and combined with the large size grit I have was blasting away the detail as the long exposure time appeared to affect the adhesion of the resist, so after trying different exposure times the Rapidmask was working well from a 30 second exposure, although I still use around 1min 30secs, habit. The grit size used is from 180 to 220 which is like flour compared to what I am using.
I am now using 180 in my new cabinet which is quite fine and off course the more you use it the more it breaks down, I still have my course grit in the other cabinet for glass carving and deep etching for colour fill.

All in all it was a great to see how the pros produce all of the beautiful work with such apparent ease and many thanks to Kevin for taking the time out to show me the business.

Please help with the blog by being a contributor I'm sure the reader will appreciate.

Paul

Monday, 27 June 2016

Cabinet modifications

Hi


One of the main jobs I have undertaken is the purchase of an elderly blasting cabinet and its modification, since I have been working predominantly on wine glasses and tankards a smaller cabinet was necessary. 

After a lot of years building and using cabinets I have a fair idea of what I want in a cabinet, easy access, bright lighting and strong extraction, these are the 3 main pre-requisites that are generally missing from most mid priced cabinets. So I bought an old, once expensive cabinet with 2 of the requirements and its made of plastic.

The cabinet I chose is a Guyson Jetstream 22.


Its a front lifting pedestal cabinet, the smaller of the 2 plastic body's that Guyson make, the other being the Galaxie.


This type of cabinet cry's out for modification and I took up the challenge, the cabinet cost £210 plus a whopping £60 pallet delivery still a basic SBC 220 would a lot more so a bargain.

The lighting was very basic, just a bulb in a glass case which was broken but on the up side the cabinet had never been used for blasting, whoever had it used it for blowing dust as there was only a blowgun in the cabinet and the extraction hole was blanked off. It just needed a good scrub and it was as good as new.

The first change was the lighting system, I had bought 2 LED floodlight from ebay.


and the first job was to bolt this to the top of the unit.


The next job was the arm entry holes, I hate using gloves so they had to go and I designed and built rubber arm hole adapters.

These consist of 3 separate parts a outer flange an inner flange with a locking ring welded on with nuts welded for locking grub screws. The rubber is the sandwich in the middle.


Put them all together and we have arm holes.


Better than the huge gloves fitted.

The inside of the cabinet that the gloves fit around now take the turned rings and tighten in place with the grub screws.


So now I just put my arms through and the slit rubber forms around and makes a seal.


The down side of all this steel is that it makes the front of the cabinet very heavy so I made a handle to aid lifting, since using this cabinet I have found that I hardly require to lift the cabinet as most glasses fit through the arm holes.


I also had a tin of paint mixed to approximate the colour and sprayed everything.

Air supply and control.

This is the main part of the modification as I wanted the pressure regulator, lighting and extraction all accessible from one control box on the top of the unit.


I gathered together the switches, regulator and pipe fittings then bent a box to fit it all in.


The air regulator has a tee fitted before the inlet to act as a bypass to supply full pressure air to a foot operated blow nozzle situated inside the unit.


I built up the control box and bolted to the top of the unit.


The lighting wire attached and hoses run.


The gun I am using is the big 6mm nozzle I bought last year for my other cabinet and used in conjunction with the foot pedal.


I stripped down the pedal, painted and fitted smaller fittings to the in / out.


Once I decided where the foot pedals could fit for the best I bolted it onto the unit and drilled the holes for the pipework.


The air blower pipe work exposed and the operating button, just press for air flow.


The hoses are run through the unit.


I have fitted a water trap regulator to the back of the unit, there is also a water trap attached from the comp outlet so nice dry air.


You can see the air inlet quick release fitting on the water trap inlet, so the route is thru the trap to the control box reg, out of the reg to the foot switch, out of the switch to the nozzle. 
The blower runs from the bypass tee to the green button switch then through to the cabinet.


This is the inside of the cabinet.


The nozzle pickup is buried in the media under the grid and the blue tube from the negative pressure pipe at the back keeps it in the air and the black hose is the blow tube.


So, just plug in the air, press the pedal and off she goes, then press the green air button and and you can blow the glass clean.

Extraction.

The cabinet had a huge 100mm outlet at the back and a diffuser cover plate at the front.


I had to reduce this 100mm down to fit a normal hose and found the reducer on ebay from a company called Charnwood.


Unfortunately the O.D of the reducer is the same as the cabinet outlet so I made a mitred adapter with grub screws to take both ends.


The power for the vacuum is a simple 3 pin metal cased socket wired into the controller switch. 

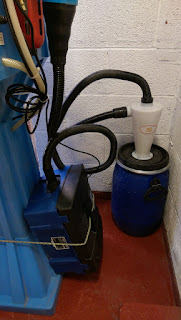
I had originally bought the Scheppach dust extractor thinking it might manage the dust but it was to fine for the bag so I had to add a cyclonic trap between the outlet and the vacuum.


This is the same system that I use on my big cabinet and works extremely well, the dust is swirled around and drops into the tub with only the smallest amount reaching the vacuum. This is a cheap Chinese copy only £13 inc delivery from China by airmail, amazing.

Everything works as planned and I am very pleased with it, the height for viewing is perfect and after a little practice my feet find the buttons without a problem.


The extraction is very powerful and clears everything immediately, the light in such a small space is very bright with the bonus of not giving out huge amounts of heat that the halogen light give out.

Only one drawback that I shall rectify is the small amount of media that falls out when the lid is lifted, easily fixed by making a small catch plate to fit on the underside.

Please read my last blog about being a contributor to this blog I'm sure the reader will appreciate.

Paul

Instruction from yourself

Hi

Its been quite a while since my last post, probably suffering from POST traumatic stress; anyway back up and running.

I have been rather busy on the etching front and of course working month on month off at sea but am home now and mostly likely on a permanent basis so its up and trying to start an etching business.

I have been getting lots of practise in since Christmas with over 50 glasses and around 20 coasters made for people so getting the business moving along nicely.
I am hoping to change a few things in the future concerning the blog, one of the reasons I was not keeping it up is that they is only so much knowledge in my little brain and I had mostly exhausted the little I had and reading about me making glasses day in day out will be a yawn fest; SO

As the saying goes this is where you the audience sings along.

Most of the people reading this will be very talented in the field of not only glass etching but also in deep carving, shading, engraving, subject designing, software, inlay, gold leafing, glass painting, photographic half toning, bottle etching, paver etching, light stand making, glue chipping, glass painting, edge chipping, glass cutting etc etc.

A lot of you people have all of this knowledge rattling around in your heads with no outlet for passing it on, well now I am offering an outlet.

The idea is very simple, just like Instructables, it can either be a step by step tuition in photographic form or photo and video format. Under each photo is the detailed explanation of how your process is achieved, add links to other aspects or people doing the same thing, however you want.

All you would have to do is to photograph your subject and write up in a word document and send your pictures to me, I will upload the photographs / video and do the write up. All credit will be given to the author with a photo of yourself if you wish and a link to your site or Facebook page, hopefully this will take off and a comprehensive training package can be put together. 

I have wrote to a couple of gifted people in the hope of there inclusion with one affirmative and one not answering.

It only takes 1 person to get the ball rolling

So if you wish to join in then please let me know.

Paul